Daylight savings time started last Sunday and as when traveling across time zones, you should ensure your cameras’ clock is correctly set. Since the date and time taken is written to the file as metadata when a photo is taken it is a good thing to have this information accurate.
Also, if you want to have your photos to have their DateTime Taken values set to a high degree of precision here is a trick you can do using your smartphone’s clock, the freely available app GeoSetter, Geotag Photos (optional) and your Windows PC.
1. Check your smartphone’s clock – Your smartphone typically has a functionality to automatically set its own date and time, make sure it is on. Smartphones use their carrier’s clock which is set to a precise date and time – most likely synced to the NIST atomic clock.
2. Using your camera, take a photo of your phone’s clock. I use the app geotag photos which displays clock down to the second for precisely setting your camera’s clock. Should be done at the geographical location where you are taking your pictures so you can record the correct time. Geotag photos has a nifty feature which alerts you when the time zone has changed.
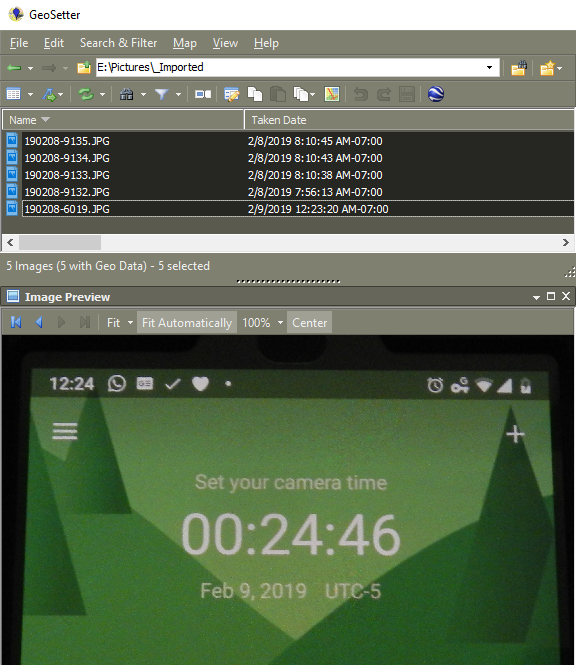
3. Import you photos into your PC – Import your photos as you regularly do.
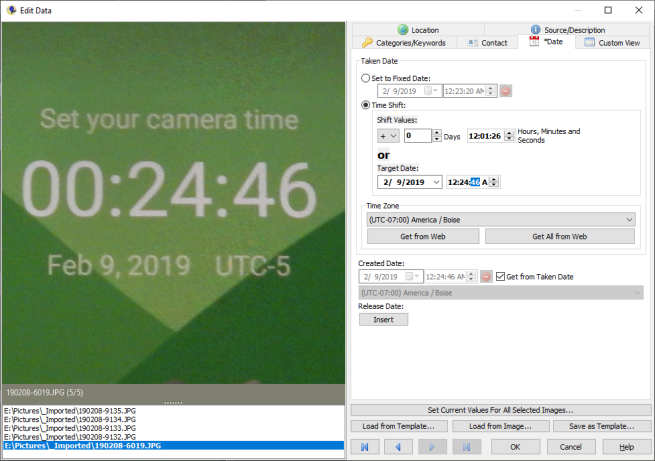
4. Select your photos – Open Geosetter and navigate to the folder your photos were imported to. Select the photos you which to have their time adjusted. The last photo you select should be the picture of your phones clock taken in step 1, as this will serve as the benchmark to which the selected photos will be adjusted to.
5. Time shift – In Geosetter, click to Edit the photo data from the menu bar: Edit -> Edit Data or press <Ctrl>+<E>. Check the Time Shift checkbox and set the target date as the same date and time which appears on the photo you took of your smartphone. You will need to click on the [Set Current Values For All Selected Images…] button and ensure the Date Taken is selected so that the time shift is applied to all the photos you have selected.
6. You will not that the values have changed and mark as red in GeoSetter’s main window. Click on [Save] from Geosetter’s main window and the metadata is saved back to the files.
—
For further understanding around the challenges surrounding Time Zones in computing check out this video.
For some time I have wondered it would be neat to capture ambient weather information when a photo was taken. Why? you may be wondering. Well, along with the image itself the accompanying metadata captures a lot of the moment. Basic information contained within a modern digital image file of course is the date and the time when a photo was taken. Smartphones and certain cameras can also capture the location geo coordinates using GPS or other geolocation methods. Cameras can even detect faces and even perform facial recognition identifying people in the photos. Already smartphones have pressure and temperature sensors so if the information is available why not record that information to the image metadata as well?
This information can be used to aid photo organization and searching in various ways. AI image analysis could also use this information in identifying and classifying images. For example, if an AI engine is almost certain that the image contains snow or rain, would not humidity and temperature values be helpful to increase its certainty? Classification of images as taken indoors or outdoors could also be aided using these values.
For cameras which lack capability, this information could also be added during post-processing. An image file with the date and time information along with geo coordinates it would be possible for a web service with historical weather station information to return this values so that they can be added back to the file. Apps such as Snapchat already do this as “stickers”. Services which contain historical weather information are: NOAA Centers for Environmental Information, Weather Underground and Open Weather Map.
Screenshot from Geosetter displaying the weather related EXIF tags for a photo in its Image Info panel.
Weather Tag
Update 10/2018 – I wrote a simple Windows command line application for adding weather information to a set of images. Using the date and time a photo was taken, the app matches the weather reading from a file containing periodic weather readings. The project is hosted in https://github.com/josemoliver/WeatherTag
Update 4/2019 – Flickr now displays this information for recently uploaded files – here is an example. On the photo page if you click on the Show Exif link it will include Ambient Temperature, Humidity and Pressure readings, if available.
When I travel I like to keep a log of the places visited as well as ensuring my photos are adequately geotagged. I started some years ago when I got a handheld GPS to continuously log my location and then using a desktop software like GeoSetter to embed the geolocation information into my photos EXIF metadata with the GPS location the photo was taken.
Nowadays it is much easier, as my smartphone photos are automatically geocoded with GPS location information at the moment the image is taken. Still, using GeoTag Photos Pro, I keep a track of my movements for later embedding location info to the photos taken with my SLR camera which lacks GPS functionality.
Post editing the photos at home after the trip, I added to the photo metadata the names of the places visited to the corresponding IPTC location metadata fields using the desktop app Geosetter. You can see the image metadata of an image taken on the trip here as an example.
Here is where your Foursquare check-ins come in handy, as you can use them to add missing location metadata using Geosetter.
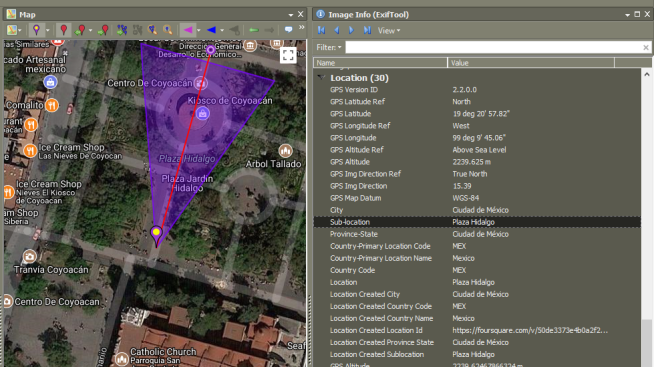
GPS information and location names added to the embedded metadata of the image filem shown here using Geosetter. The metadata of this particular image which was taken at Plaza Hidalgo can also be seen here.
To add Foursquare Swarm Check-in Location names to your photo metadata:
1. Export your Swarm/Foursquare Checkins as a KML file – Foursquare’s Check-in Feeds page will allow you to export your Swarm checkins to a KML file. Just right click on your private kml feed link and save the file to your desktop.
2. Load the KML file into GeoSetter as a track file – Within the GeoSetter desktop application, click on the Tracks section Open file button. If it is not available, click on View -> Tracks, to enable.
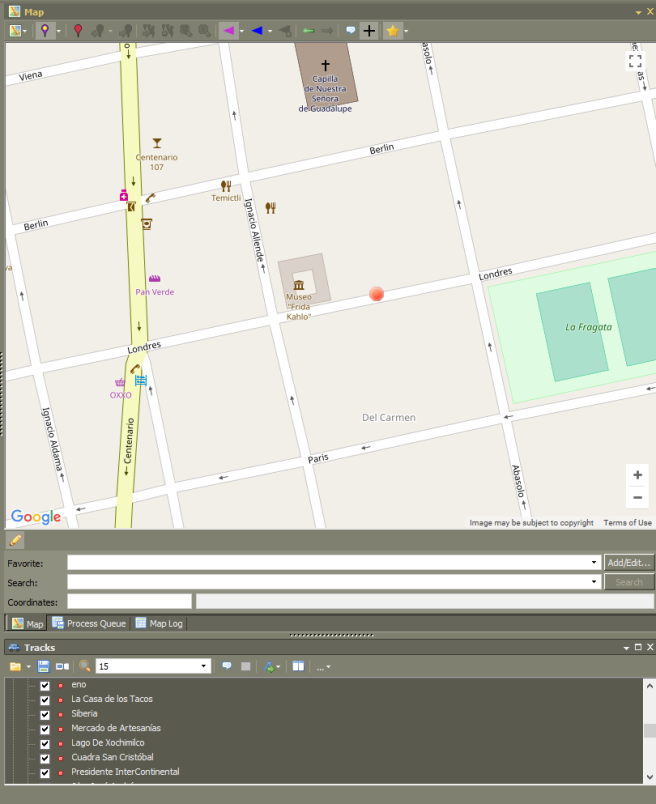
3. The dots which will appear on your map correspond to a check-in location. It may not necessarily be on the exact location but it still provides you with the place name:
Foursquare check-in history loaded in Geosetter. Check-in locations are shown as dots on the map.
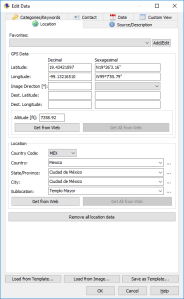
4. Select the image files you wish to add the location information and you can manually add it:
Geosetter’s Edit Data dialog box allows user to add or edit certain metadata fields for an image file.
Scanning photos taken by grandparents on a trip to Europe in 1960 is quite fascinating. Seeing the places they visited, some which I have also had the opportunity to visit as well, is a nice way to remember them. However, the photos presented a bit of a challenge- while some had handwritten captions mentioning the location they were taken, most lacked this information.
Modern digital cameras embed metadata into an image file with details such as the date/time taken and geolocation. These bits of information make it easier to know where a photo was taken. So with these analog photos- I have only a black and white image of an unknown place.
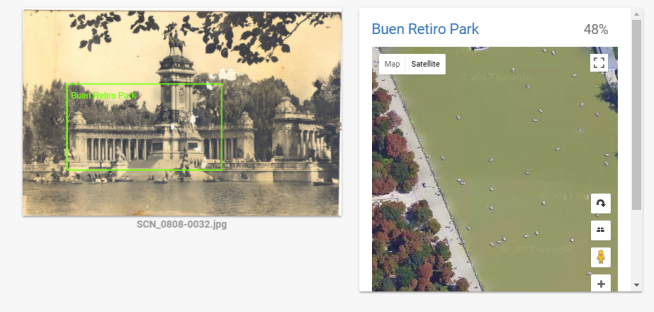
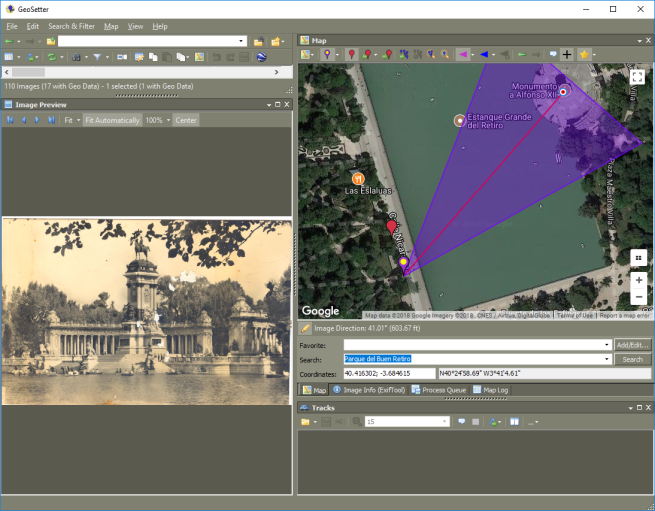
The Google Vision API provides a way of identifying landmarks from photos. In this example, the service correctly identified the photo as taken at the Buen Retiro Park in Madrid, Spain – https://cloud.google.com/vision/
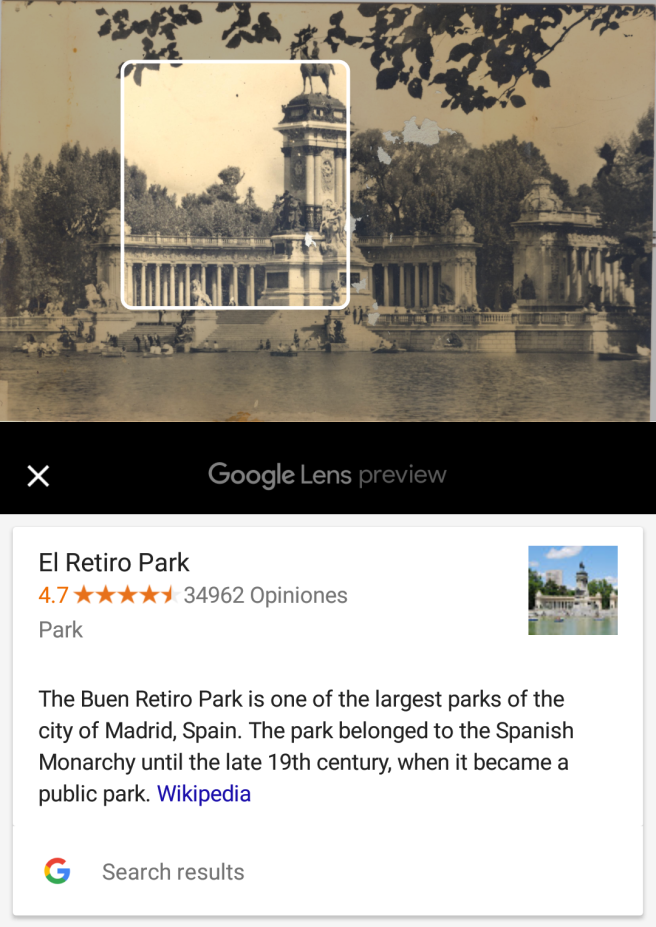
In mobile devices, Google Lens also uses this technology to recognize landmarks and present relevant information.
Google Lens uses Google Vision to identify landmarks from images.
Adding location information to the image file metadata
After positively identifying the landmark and geographical location where the photo was taken using Google Vision, I turn to GeoSetter for adding the missing geolocation information as well as captions to the image file metadata. Adding this information allows other applications and services to use it as well.
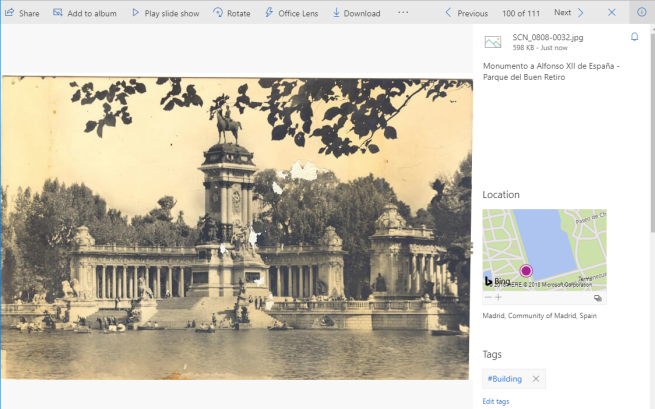
Applications or services as OneDrive can use geolocation data to display the location on a map. The caption is also displayed showing the name of the monument as it was identified with the help of Google’s Landmark Recognition engine.Geotagged photo shown in Windows Photo Gallery – the added metadata of the location taken is shown as a Geotag.
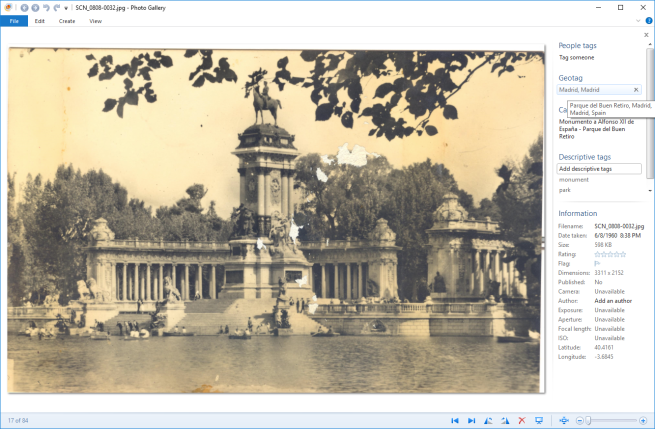
First, a quick explainer on how geotags are saved in image files and used to work in Windows Photo Gallery (WPG) – As you may know, photo files such as JPG can store additional information called metadata. The best analogy for understanding what metadata is by imagining a printed picture with written information written on the back. There are multiple ways (formats) of writing this information known as EXIF, IPTC, XMP. Think of it as paper forms with fields (such as date, time, caption, locations) to fill in, which are added to a photo.
Here is the general logic behind Windows Photo Gallery’s Geotags (in order):
1. If a photo already contains Location, City, State/Province and Country fields filled in, WPG would use the information it has to display as the Geotag. It would display the IPTC Extension fields as the first choice (if available) and the IPTC Core “legacy” fields (if available) as the second option.
2. If a photo has GPS Latitude and Longitude, but no City, State/Province, or Country information in the fields described in (1), then WPG would consult a Microsoft web service to determine the “Geotag” based on latitude and longitude, this process is called reverse geocoding. It will not however, write the “Geotag” information back to the file, unless they are edited manually by the user.
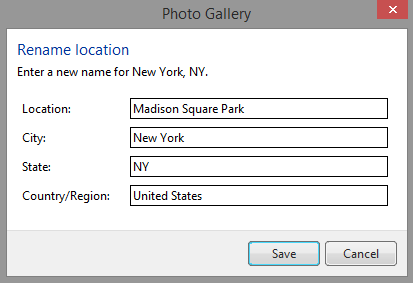
Windows Photo Gallery “Geotag” rename dialog box. When edited, the information is saved back to the file to the IPTC Extension “Location Created” fields.
Given that Microsoft decided to discontinue WPG last year, the service which determines the geotags is no longer working, so holdout users may find these fields empty or have trouble adding new geotags. Hence, exiftool, Lightroom or other photo management applications will only be able to show you geotag information if it was written within the file.
GeoSetter to the Rescue
As a workaround, I rely on a freeware application called GeoSetter (which internally uses exiftool). Geosetter uses a service from Geonames.org, in a similar fashion which WPG did, to aid in finding location info as well it allows users to edit them manually. I exclusively have been using GeoSetter for some time, which unlike WPG it will always save the information back to the photo file. GeoSetter also allows one to edit the latitude and longitude info, which I was unable to do so in WPG.
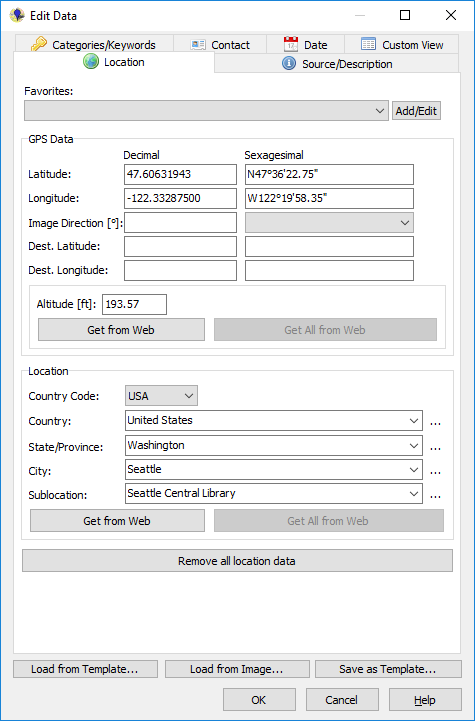
GeoSetter’s Edit Data dialog allows users to edit EXIF GPS as well as IPTC Location fields.
To make GeoSetter read any existing WPG Geotag – You will need to copy any saved “geotag” information from the IPTC Extension, to the equivalent IPTC Core fields using an exiftool command. In a previous post I described how to use exiftool for accessing Windows Photo Gallery. You will only need to run this step once on your photos from the command line. I advise you to make a backup copy of your files before executing it.
-r means that it will execute recursevly, so that all subfolder are included. -overwrite_original means that exiftool will not create a backup of the file.
Again, this will only work on file which WPG saved the geotag information to the file, otherwise the fields will be empty.
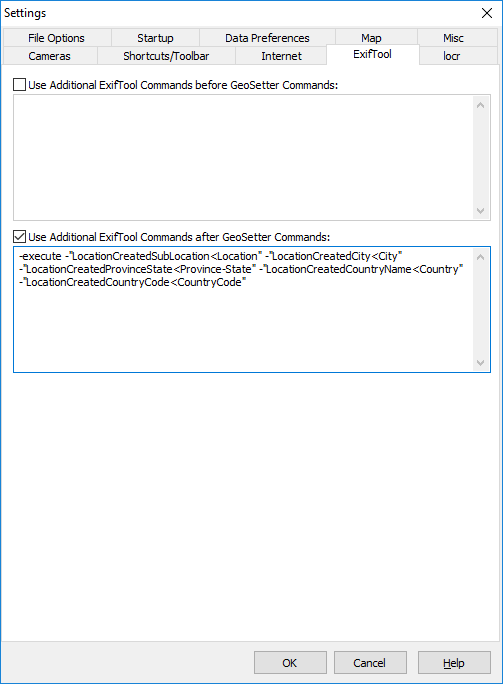
To configure GeoSetter write back information to the newer format when an edit is made– In the GeoSetter application menu, go to File | Settings. In the Settings dialog, go to the “ExifTool” tab. Ensure that the “Use Additional Exiftool Commands after GeoSetter command” checkbox is enabled and add this text to the text field underneath:
GeoSetter’s Settings dialog. Adding additional exifool commands allow custom actions such as copying field values to another. In this case location information is copied to IPTC 2008 Spec fields.
If you are still a die hard Windows Photo Gallery fan, you will find that with these tips the geotag information populated with what you was entered by GeoSetter. While the reverse geocoding capability may be gone, you can still use WPG sort by GeoTag and Search functionality as before. Still, looking forward, I would avoid editing geotags in WPG and rely instead on GeoSetter as a replacement for this functionality in order to avoid the problems previously described.
The face information would be saved back to the file as XMP metadata using the Microsoft People Tags Schema. This means that the Face recognition information was saved within file instead of being kept seperate in the app’s database. This is a plus for archivists which would like to preserve this information within the file, but also comes with certain privacy issues.
An amazing additional feature is that you could optionally connect your Facebook account to Windows Photo Gallery and upload photos to that social networking service from the app. Windows Photo Gallery would maintain a link from the photos on your PC to the copy in Facebook. If any of the faces in the uploaded photos were tagged in Facebook by you or others, it would be then also tagged back to the original photo on your PC via Windows Photo Gallery. In a way, you could leverage Facebook to crowd source your people tagging efforts. Quite useful for class reunions or large family gatherings and you wanted others to do the heavy lifting of identifying people in photos. Sadly, this particular functionality was shut down when Facebook decided to pull the plug on Facebook Connect.
Microsoft’s People Tags can be read by Windows Explorer and some third party applications such as Google’s Picasa, Digikam, Photo Supreme, Photo Station, GeoSetter . The People Tags schema never gained much support with other photo organizing apps as many opted to use the more industry accepted Metadata Working Group Face Regions schema, which interestingly Microsoft worked on as well, but never embraced it in Windows.
There are various options to storing People/Face information, either by storing within the file metadata or in an external file or database. I will try to highlight some these options with this post. In all you may have devoted a lot of time in manually including People Tags in your photo collection, so here are some ways to ensure that effort has effort was not in vain. Select the option or options best suited for your workflow.
First things first, as with any file operation which involves modifications, ensure you have backed-up your photos before proceeding.
Exporting People Tag Data to a File
The following command will export the people tag persons displayed names to a tab-delimited file named PeopleTags.txt which can be opened in Microsoft Excel or a database such as Microsoft Access. This is particularly helpful when you wish to create an index or analyse you photos’ metadata fields in ways your photo manager may not be capable of.
In addition to the exiftool executable, you will need to ensure you have the proper exiftool config file for converting mp tags to mwg. The config files extend exiftool functionalities to do other things. In this case, the config file needed is the convert_regions.config which can be obtained in the full Image-ExifTool (.tar.gz) distribution or downloaded from here. A forum discussion thread on the subject can be found here.
The command to use to convert Microsoft People (MP) Tags to Metadata Working Group (MWG) Regions is:
For Face Regions to be displayed in Adobe Lightroom, the MWG Face region name needs to be accompanied by a keyword. As far as I know, this is not mentioned in the MWG spec, but it is a quirk in Lightroom. To accomplish this you can use the following command. Also, as keywords/tags are read by many photo management applications this is a good way to make person’s names available, or when uploading files to a site such as Flickr which reads this information and adds them as tags to the photo.
Recently I came across Tag That Photo, which is a Windows desktop application which has a face detection and recognition functionality similar to Windows Photo Gallery’s. It can read Microsoft People Tags as well as MWG Face regions. The fully licensed version writes face metadata back to the file as MWG Face Regions. The app seems like a good option to support other photo management apps which read MWG by providing a decent face recognition engine.
With the demise of support to Windows Photo Gallery, it may be a good time to plan an app migration. I have seen various posts and comments on this, particularly after all the time and effort you may have spent tagging photos. The app which is meant to replace Windows Photo Gallery is the Windows Photos App. Unfortunately, the Windows Photos app does not support Captions, Descriptive Tags, People Tags nor GeoTags and to date I have not found any information which points that those features will be supported in the future.
So do not fret, as one of the pluses of using Windows Photo Gallery is that most of this information is stored into the image file and is accessible in Windows Explorer as well as any other apps which support photo metadata standards. Only in some instances this data is not stored to the file itself, such as “Flags” or if the image file in PNG or is set to “read-only”.
Understanding where the metadata is stored
Windows Photo Gallery stores much of this information as photo metadata using standards such as EXIF, IPTC IIM, and XMP (IPTC Core, IPTC Extension, Dublin Core and Microsoft Schemas) . I will not delve into the specifics of these standards but it is worth knowing to which fields the information is mapped to. In some occasions some information may be stored in multiple fields. For example, WPG captions information is stored in the XMP:Title, XMP:Description as well in other IPTC and EXIF fields.
The following table lists some of the photo information displayed in Windows Photo Gallery and the corresponding metadata fields from where the information is read and written to. I created this table from plain observation, if you find any other behavior let me know.
For reading and writing to these tags I highly recommend the excellent Exiftool command line utility. It may be daunting for some users to use the Windows Command line so I will try to be as specific as possible.
Reading Windows Photo Gallery Metadata using Exiftool
Installing Exiftool
(For Windows Users) Download the stand-alone Windows Executable from the Exiftool site.
Unzip the exiftool(-k).exe and rename it exiftool.exe
Copy the exiftool.exe to your c:\windows folder or to a folder contained in the PATH variable so it is accessible in any directory/folder. Detailed installation information can be found here.
Using Exiftool
Open your command prompt in a folder containing photos either by running the Command Prompt shortcut in the Windows App Menu or by right mouse clicking on a folder while pressing the <Shift> key and selecting “Open Command Window here”.
Confirm you have the current exiftool version by typing into the command prompt:
exiftool -ver
Pressing <enter> will return the version number.
Just typing the exiftool and the image file name will bring a host of information.
Example:
exiftool IMG_1234.JPG
Say you wish to view the Windows Photo Gallery Captions of all the jpg photos in a folder, just open the command prompt in that folder and enter:
exiftool *.jpg -xmp-dc:title
View all the WPG Descriptive tags:
exiftool *.jpg -xmp-dc:subject
Additional information on using Exiftool can be found in the following links:
Exporting Windows Photo Gallery information to a File
This example will produce a file named “PhotoMeta.txt” which will contain a table with the filepath, filename, date and time photo was taken, camera maker, camera model, wpg caption, wpg descriptive tags, and wpg people tags contained in the current directory and its subdirectories.
Using the “-T” option will output tab-delimited results. The “-r” option is used to include all the subdirectories contained within the specified “Pictures” directory. You can later open this table in Excel or import it to a database such a Microsoft Access for quick analysis.
As more cameras are GPS enabled it aides in establishing the “where” the photo was taken. A common example, is when you take a photo with your smartphone and share it on Instagram. During the upload process, Instagram provides a way to add the location where the photo was taken. Instagram uses the GPS data of the photo and looks up locations from the Facebook Places database (Instagram switched from using Foursquare to Facebook Places after being acquired by Facebook). After your photo is uploaded Instagram the photo is “linked” to that location. You can quickly see the photos you and other took in that same location. This IPTC standard simply allows you to save that association within the file.
Now, the benefits from this may not become entirely clear now but if such a “location identifier” is already included within the photo it could bring with it some benefits. From the previous example, it could ease the upload process since Instagram or any other photo service may be able to deduce quickly the location of a photo. I am not sure of any photo services which does this yet, but for example, Flickr for some time has implemented something similar using machine tags.
In Flickr if you add a tag to a photo pointing to a foursquare location in the form of foursquare:venue=, Flickr recognizes the location and adds a map with the foursquare location.
A Smarter Search
Say you attend a basketball game in Madison Square Garden, and take some photos. Your smartphone recognizes where you are and “tags” the photo with the WikiData entry for “Madison Square Garden” (Wikidata Q186125, Foursquare VenueID). You upload a photo to an online photo sharing service, such as Google Photos and perform a search for “basketball game” or the team which played on that date. Given that the Wikidata identifier is associated with the type of venue and the type of games played there, a search engine with some “smarts” can deduce that a basketball game was played on the date you took that photo. Similarly, if Google Photo employs some of its image recognition on the photo it can have some additional information to make a better analysis of the image.
Also, a location may have different names and may be spelled differently in several languages. Linking a location to a Knowledge Base such as Wikidata allows a search engine to better understand the context of a photo.
So you see, the IPTC Location identifiers opens up some interesting scenarios and it is quite useful for photo archivists, librarians or a home user which may also be looking for ways to link photo to similar knowledge bases.
Following up on my previous post on Geotagging Photos with Foursquare / Swarm Check-Ins, I stumbled upon an interesting scenario- How about a solution in which you could use your Foursquare/Swarm check ins, but the location information from Foursquare, Facebook, and Instagram.
I did some research and found possibly the best app for managing such data- the aptly named PinDrop. With Pindrop you can aggregate your Foursquare, Facebook, and Instagram locations as well as add your own. The locations, or pins you add on the app can be either shared or kept private. This is great for when travelling and if you want to keep track of the places you visited, but don’t necessarily wish to share it with your friends.
Now, for the frosting on the cake – you can export this information to a KML file which you can load into Geosetter. So far you can only export the data by visiting the website settings section. With the KML file you can more easily append the location place names to your photo’s metadata.
Now, combine this app with Geotag Photos Pro, which can record your location for easier location tagging, and you have a pretty interesting photo geotagging solution.
Your are on vacation, so take a lot of photos with your camera and mobile phone. You keep your friends and family up to speed on your whereabouts by checking in on Foursquare / Swarm.
Now you arrive home and want to organize the photos you took on your PC. If you like to geotag your photos and update the photo metadata geo locations here is a helpful tip.
You can use the foursquare location names of your check-in and add them to the location fields of the photos you took.
1. Export your Foursquare check-in history in kml format – Visit http://foursquare.com/feeds. Right mouse click on the kml feed link and select “Save As”. Save the file to your PC.
2. Load the kml file in Geosetter (http://geosetter.de/en)- On the “Tracks” pane, click on the open track track files button, and load the track to GeoSetter. Your foursquare locations will appear as dots on the map.
3. Assign Position and/or Name to Photos – Load the photos you which to add the geographic information and click on the waypoints from the loaded locations. You can add the position information as well as the location name to the photo metadata.
If you then load the photos on applications such as Windows Photo Gallery or share the photos on sites (such as Flickr) which can read this metadata, the information will be shown.


 Why is this interesting?

